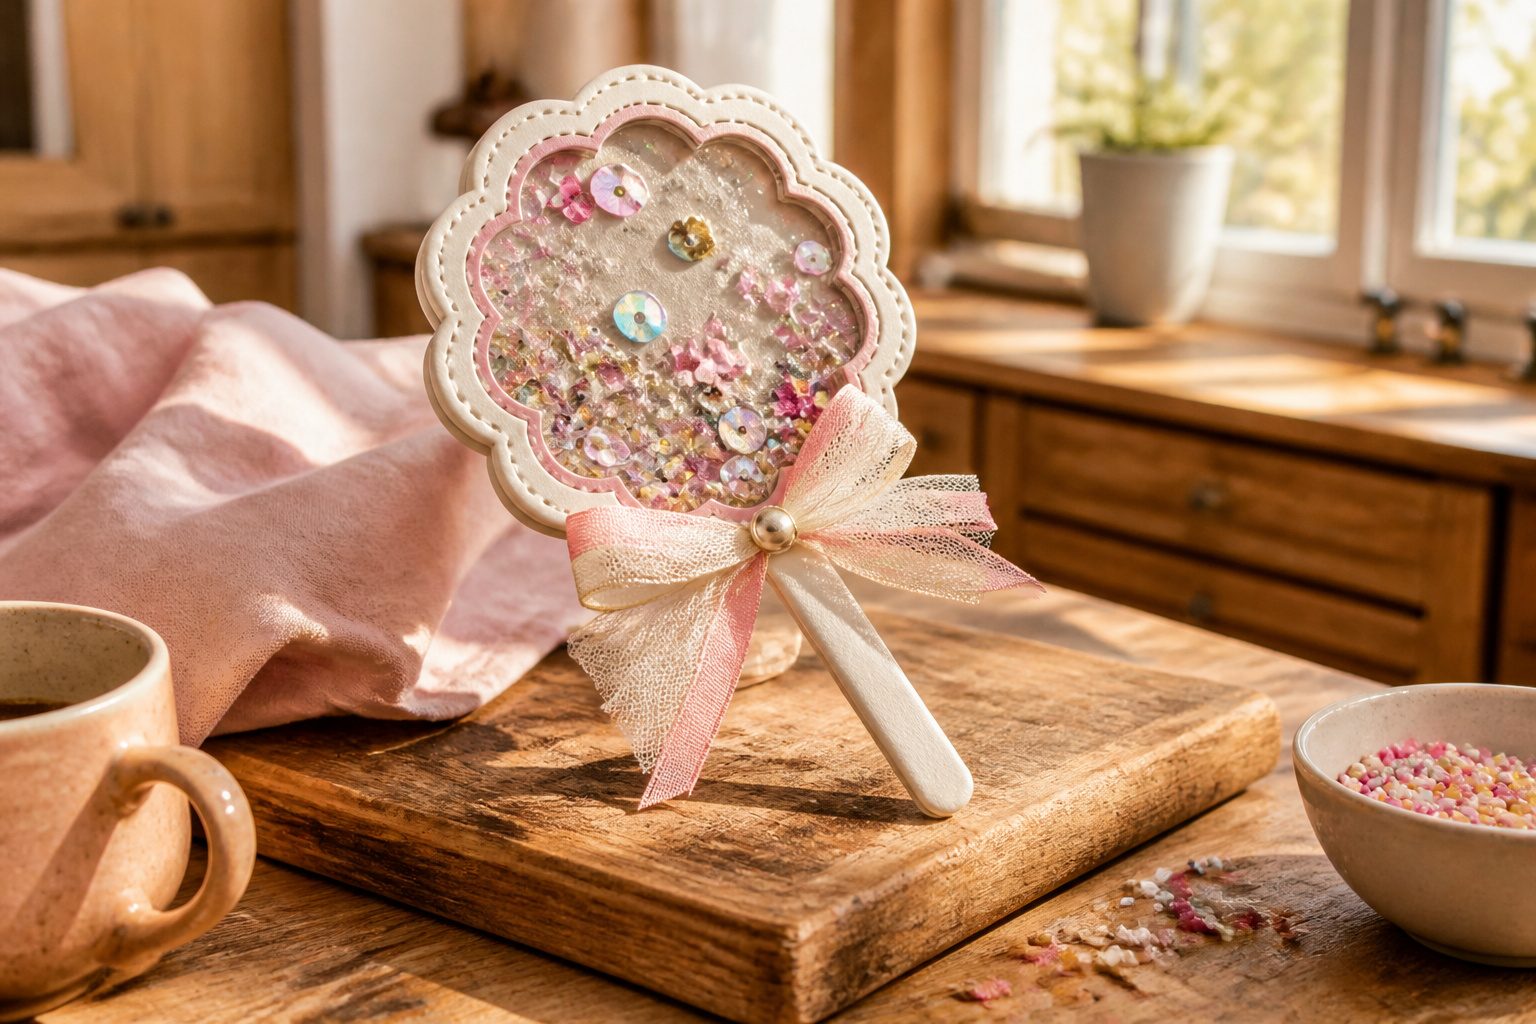
A finished cake topper shaker takes about an afternoon and sits on standard craft-store supplies: cardstock, craft foam, clear plastic, and whatever sequins or beads you already own.
The part people mishandle is the foam ring that creates the cavity; a ragged edge tilts the plastic face and the whole piece looks cheap.
Hot glue fixes this only if you keep the bead line thin and let it cool fully before the topper goes near frosting, since a warm joint will pop open under the pressure of being pressed into a cake.
How to Make a Cake Topper Shaker
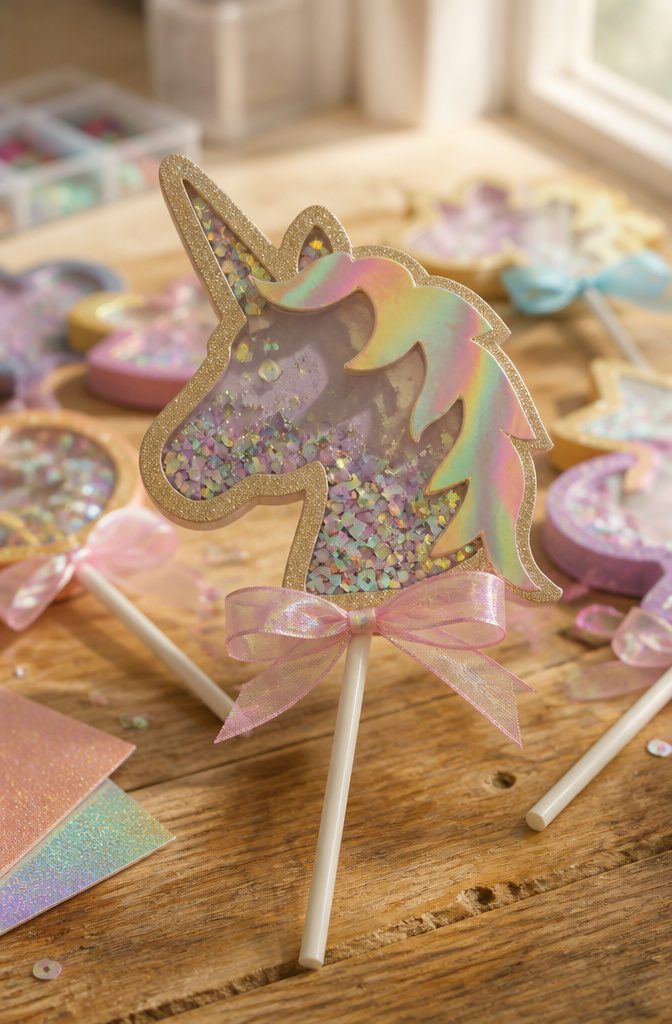
A cake topper shaker turns a flat cutout into a tiny snow globe perched on sticks, and the method most makers follow starts with a Cricut or similar cutting machine.
You will need medium-weight cardstock, craft foam sheets, clear craft plastic, and your choice of filler.
Sequin confetti and chunky glitter are the usual picks, though the plastic window between them and the cake is what actually makes the shaker work.
The basic build runs in three layers: a solid back piece, a foam ring that creates the cavity, and a front piece with the clear plastic sealed behind a window cutout.
Hot glue sets faster than craft glue here, which matters when you are trying to keep confetti from escaping at the edges.
Decorative lollipop sticks, the kind sold at craft stores like Hobby Lobby, anchor the finished piece to the cake.
Glitter cardstock and metallic iridescent paper dress up the frame without extra steps. Free templates circulate for the cutting files, so you are not drawing the shapes from scratch.
This is an afternoon craft, not a weekend build; once the machine finishes its cuts, assembly moves quickly enough that making a spare is not much extra effort.
1. Gather Materials
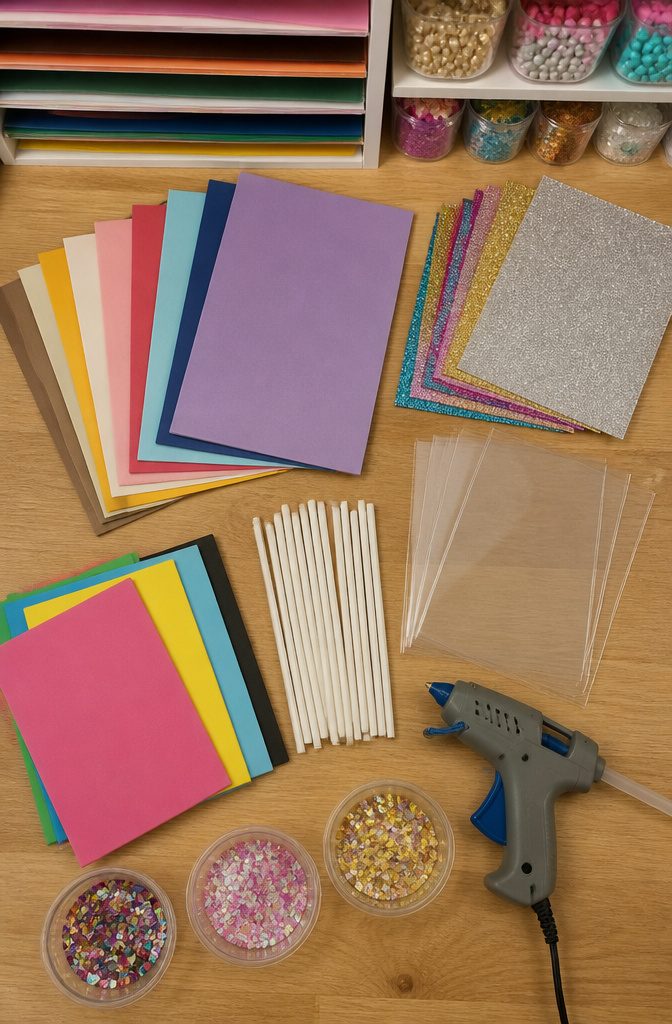
Medium weight cardstock and glitter cardstock form the body of the shaker, and metallic paper gives the finished piece its shine without extra bulk.
Craft foam sheets create the depth that lets your fillers move, while clear craft plastic, sometimes labeled acetate in the craft aisle, seals the window.
Sequin confetti and chunky glitter are the standard fillers; microbeads work too if you already have nail art supplies on hand, though they behave differently in motion.
A hot glue gun is the fastest adhesive here, though craft glue or multi-liquid glue will bond if you have patience for drying time.
Decorative lollipop sticks serve as the stake, and wooden craft sticks swap in fine if you cannot find the fancier version.
The Cricut machine with its cutting mat handles all the precision cutting; no specialty store required, since every item listed sits in the standard craft aisle of a big-box retailer or craft chain.
2. Cut the Clear Plastic
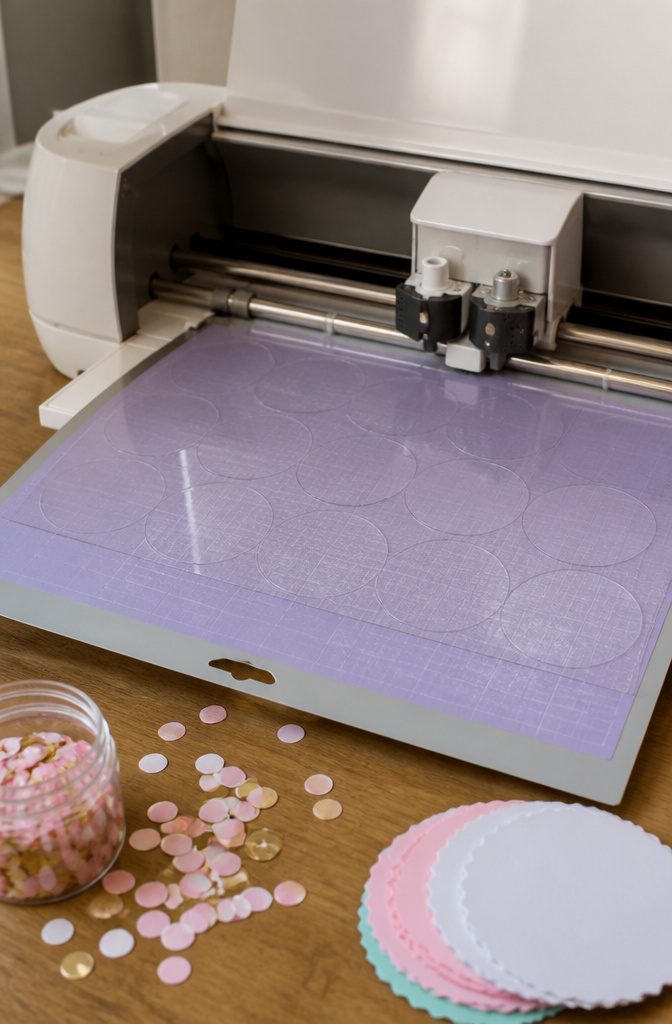
The transparency plastic setting on your Cricut is what you want for the clear craft plastic, but plan to bump the pressure up from the default.
A finer point blade will slice cleanly through; without one, the cut still works, though you’ll be peeling the plastic free from the circle by hand afterward. It separates without tearing if you go slow.
If your shaker design includes the iridescent square sheets, swap to the party foil setting for that material instead.
The machine applies lighter pressure here, which keeps the coated surface from cracking along the score line. I’ve cut both in the same project and the switch is worth the thirty seconds it takes to dial in.
3. Cut Foam and Design Pieces
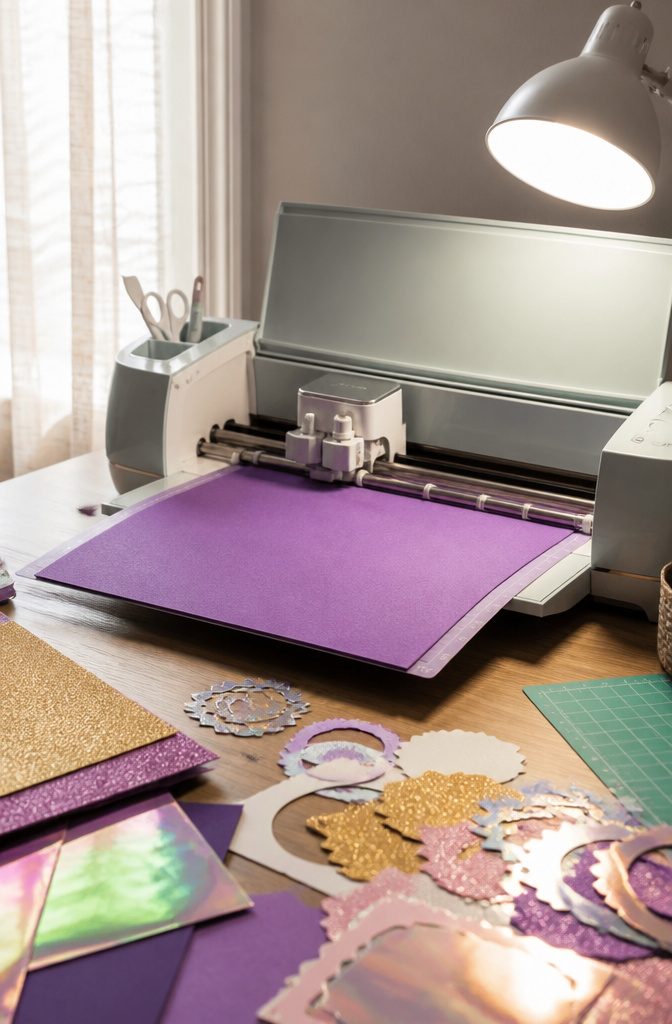
Craft foam needs a standard grip cutting mat that still has real tack left in it. If the grip has gone soft, the foam lifts mid-cut and the edges feather.
I run the foam on the perforated cut setting and let the blade do the scoring; without a deep point blade, you peel the shape free along those perforations, and it releases clean.
The decorative pieces follow the same logic: match the material setting to what the Cricut names it. Iridescent square sheets cut on the party foil setting, not on cardstock or vinyl.
Medium weight cardstock and glitter cardstock each have their own presets, and the machine adjusts pressure and blade angle accordingly. Guessing costs a ruined sheet and the time to recut.
For the foam, thickness matters more than color. The foam creates the cavity depth that lets your sequin confetti and chunky glitter move, so a clean cut edge keeps the shaker height uniform all the way around.
A ragged foam edge tilts the plastic face and the whole thing reads handmade in the wrong way.
4. Assemble the Shaker Layer
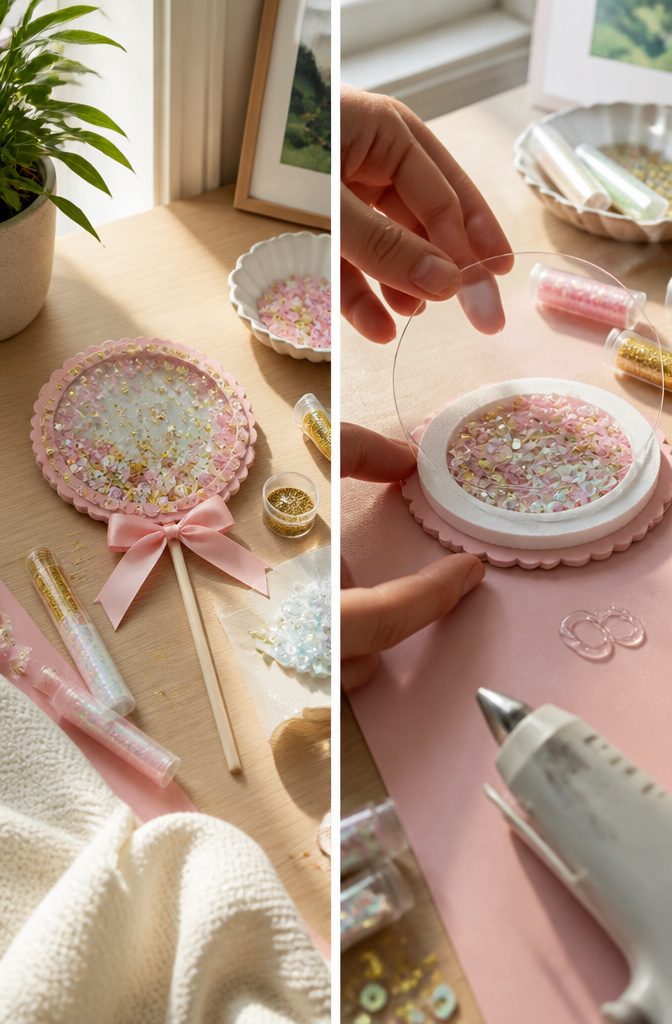
Start with the clear plastic circle and the foam base. Run a thin line of glue around the foam edge, then press the plastic on top so the two layers seal cleanly.
Once that bond sets, lift the edge just enough to drop in your sequins and glitter. I like a heavy hand here, mixing shapes and sizes for movement.
If you are working with microbeads, use a 1/4 teaspoon measure to control the pour, tipping them in slowly so they do not scatter across your work surface.
The small scoop keeps them contained and lets you add sparingly, which matters because too many microbeads will jam the shaker instead of letting it roll.
With your fillers in place, glue the second foam layer on top, sandwiching everything between the plastic window and the base.
Press the foam-to-foam contact firmly, checking that the seal is complete around the entire perimeter so nothing drifts out later.
5. Attach Stick and Decorations
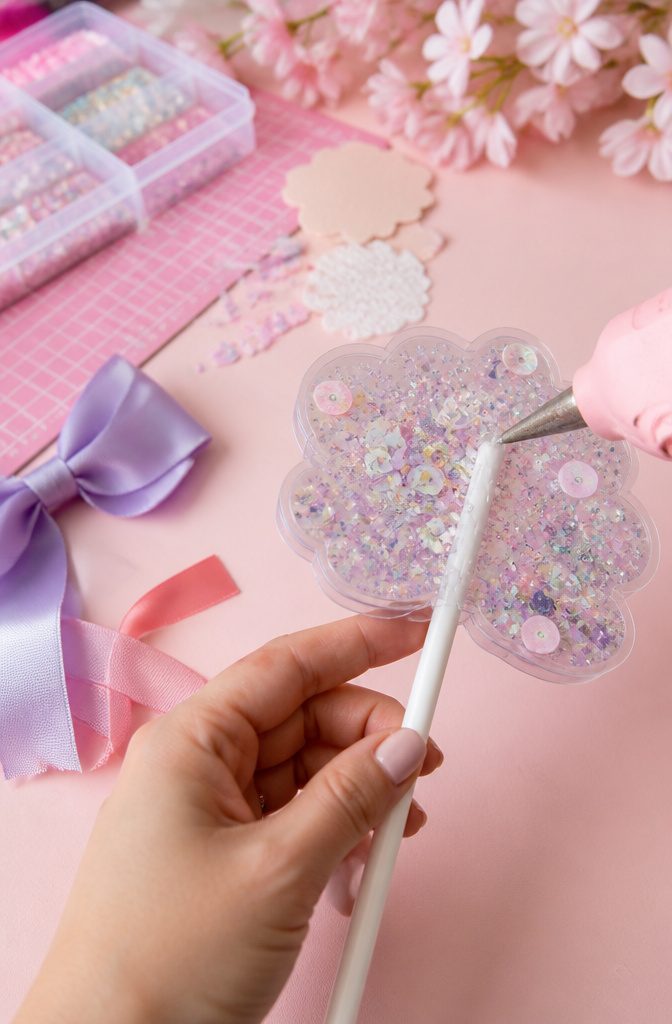
A lollipop stick glued to the back is what turns the shaker into a cake topper rather than a loose charm.
I set mine about 1 inch up from the base, which leaves enough stick below the shaker to anchor into the cake without poking through the frosting layer.
Too low and the topper tilts forward; too high and you lose the mechanical advantage that keeps it upright.
Hot glue works here because it grabs fast and fills the slight gap between the flat shaker back and the round stick.
I run a thin line along the stick’s length, press it to the topper, and hold it steady for maybe half a minute.
The glue cools to a stiff hinge that handles the weight of sequins or beads inside the shaker without flexing.
If the front of my topper looks plain, this is the moment to add any flat decorations, ribbon tails, or a name cut from matching cardstock.
Anything dimensional goes on before the shaker assembly; anything flat layers onto the back now, where the stick gives me a natural spine to build against. Once the glue is cool, the piece is finished and ready to dry.
6. Let It Dry
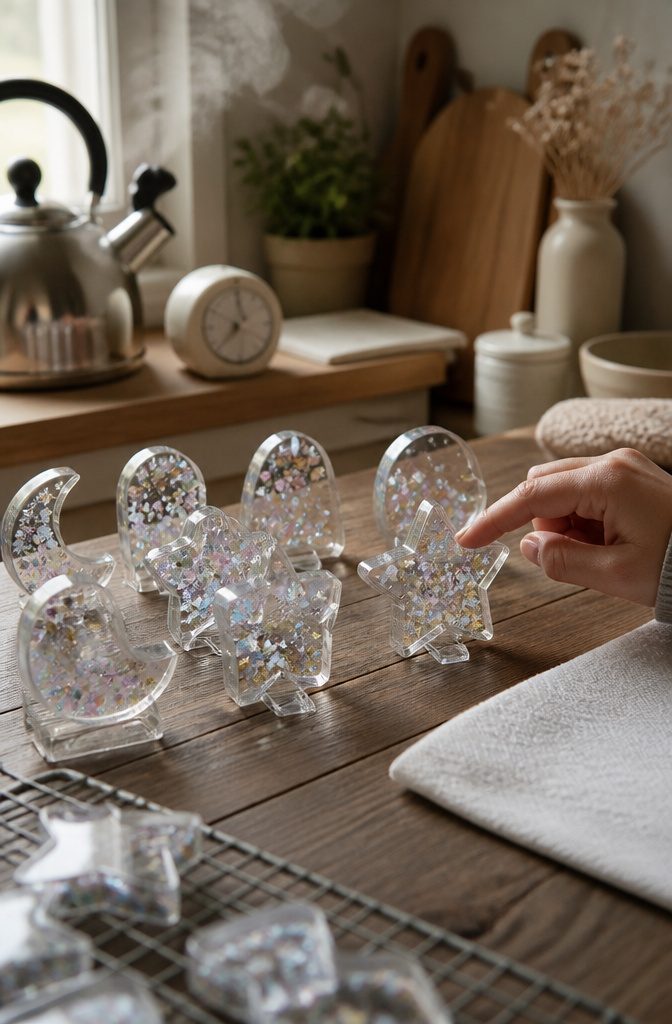
Hot glue sets fast to the touch, but the bond needs to cool completely before it goes anywhere near frosting.
A warm joint will flex under pressure, and the last thing you want is your shaker popping open while you press it into a cake.
I usually wait until the piece feels room-temperature all the way through, not just on the surface.
For a standard shaker, that is roughly 10–15 minutes in a normal kitchen. Thicker glue lines or a humid day can stretch that out, so I test the back with my palm rather than watching a clock.
If you are working in batches, this is the moment to start the next topper while the first one rests. By the time you have cut and glued the second, the first is ready for its stick and decorations.
7. Shaker Topper Designs
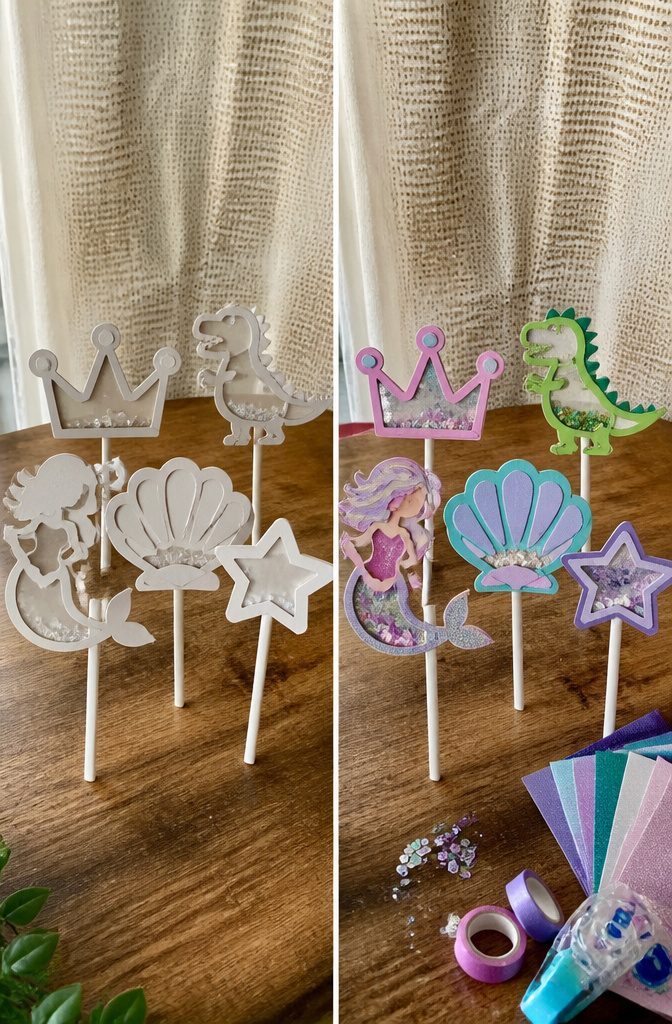
Most shaker toppers fall into three broad looks that you can tweak for the birthday kid’s name, age, or color scheme.
- Mermaid Topper: Scales, tails, and shells work well in layered acetate, with blue-green sequins or tiny pearl beads as the filler. I would keep the silhouette simple so the shaker window stays readable from across the room.
- Princess Topper: Crowns, wands, and castle outlines are the usual shapes. Glitter cardstock backing with pink or gold microbeads inside reads celebratory without extra piping on the cake itself.
- Dinosaur Topper: T-Rex or brontosaurus outlines pair naturally with green and brown sequin mixes. A jagged edge on the foam border sells the theme without hand-cutting tiny teeth.
Personalization is where these earn their keep. A name banner across the top, a number cutout for the age, or a small fondant plaque tucked beside the stick base takes any of the three from party-store generic to made-for-them.
8. Types of Fillers
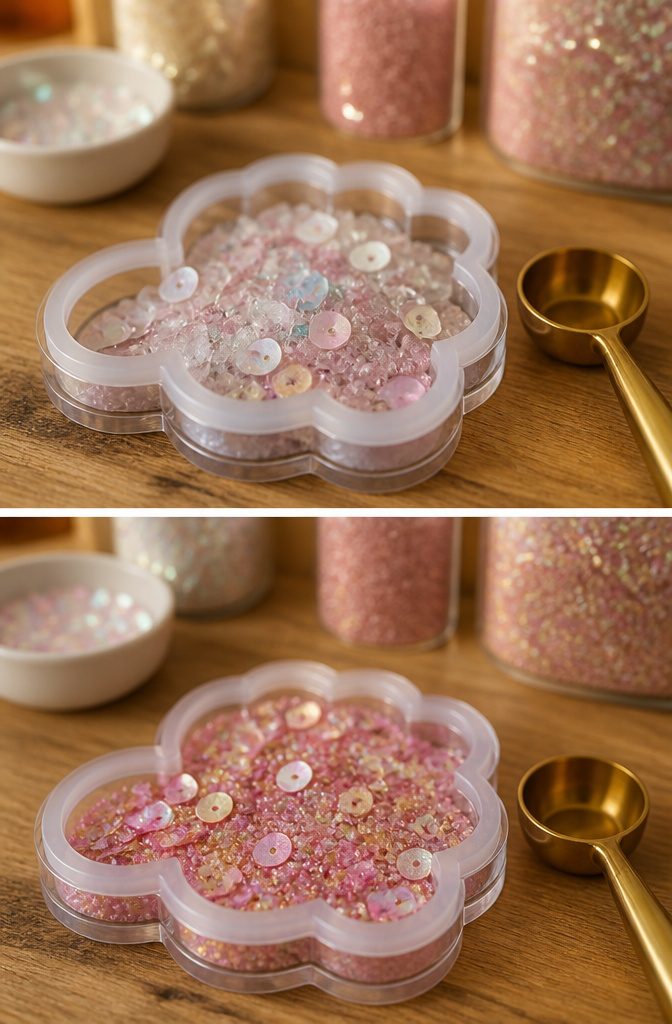
The three filler options each give a different look and a different practical experience inside the shaker.
- Sequin confetti catches light in broad, flat flashes. The pieces are large enough that they drift slowly when you tilt the topper, and they stay visible through the plastic from across a room. They can snag on adhesive if you overfill the cavity, so a light hand works better than packing them in.
- Chunky glitter gives the densest sparkle per teaspoon. The thicker flakes create depth, almost a snow-globe effect, but they also add weight. A topper filled with chunky glitter will feel heavier on the cake, which matters if your stick support is thin cardstock rather than a dowel.
- Microbeads roll like tiny ball bearings and settle with a satisfying flat layer. A 1/4 teaspoon fills most standard shaker cavities without crowding the movement; more than that, and they stack and freeze in place. They read as texture more than shine, which I prefer for modern or minimalist cake designs where the topper shape itself carries the decoration.
Cardstock and Glitter Cardstock
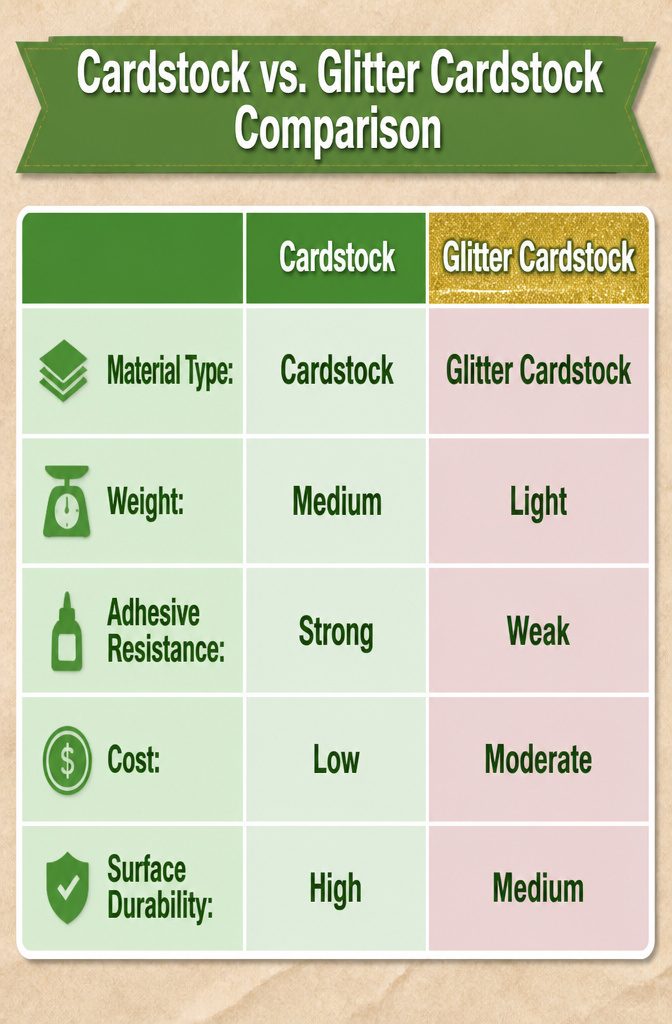
Medium weight cardstock is the material I reach for first when I am cutting the back layer of a cake topper shaker.
It feeds cleanly through a standard cutting machine, holds its shape under glue, and costs roughly the price of a sheet of printer paper.
The weight matters because you are building a shallow box that will stand on a stick and survive transport to a party table.
Too light, and the piece warps once the foam and plastic go on; too heavy, and the machine struggles to score the fold lines without tearing.
Glitter cardstock and metallic paper look festive straight off the shelf, which is why they tempt people into skipping the plain base layer.
The problem is the surface. Glitter cardstock has a rough, reflective face that resists adhesive, so your foam ring may lift at the edges after a day or two.
Metallic paper is thinner and more pliable, which sounds like an advantage until you realize it creases under its own weight when you attach the stick.
Both also shed particles into your shaker cavity if you use them for the interior pieces, where the filler beads will grind against the finish.
My compromise is to build the structure from plain medium weight cardstock, then add sparkle with the top decorative layer or with the filler itself.
If the design demands a glitter border, I cut that element separately and glue it onto the flat face rather than trusting it to hold the shaker together.
The extra step takes five minutes and saves the piece from looking handmade in the wrong way.
Sequins vs. Microbeads
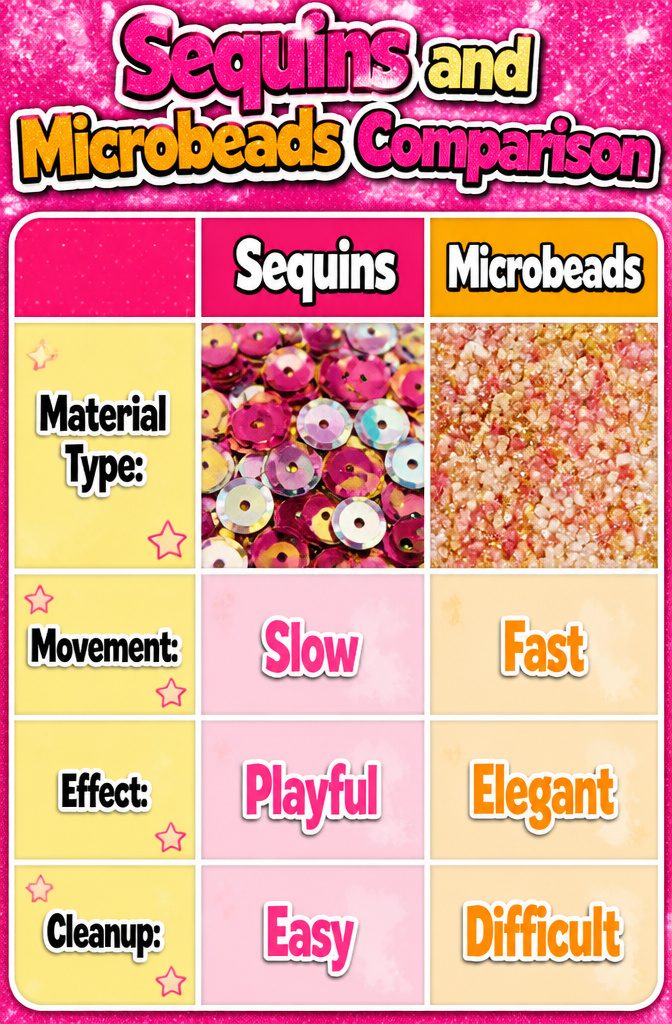
Sequins catch light and move slowly, which makes them easy to track through the plastic window of a cake topper shaker.
Chunky glitter behaves the same way but sheds more, and the stray pieces cling to frosting if the seal is not perfect.
Microbeads roll faster and settle in layers, giving a snow-globe effect that sequins cannot match, though they are harder to control during assembly and nearly impossible to clean out of a carpet.
I reach for sequins on children’s cakes where the motion is meant to read as playful confetti, and I use microbeads only on adult celebration cakes where the slower drift feels elegant rather than busy.
Chunky glitter sits in the middle, acceptable when I want sparkle without the bead-rolling problem, but I have mostly stopped using it since a few flakes escaped onto buttercream and the client noticed.
The cleanup difference matters more than the visual one: sequins vacuum up, microbeads scatter, and glitter stays where it lands.
What the Shaker Does
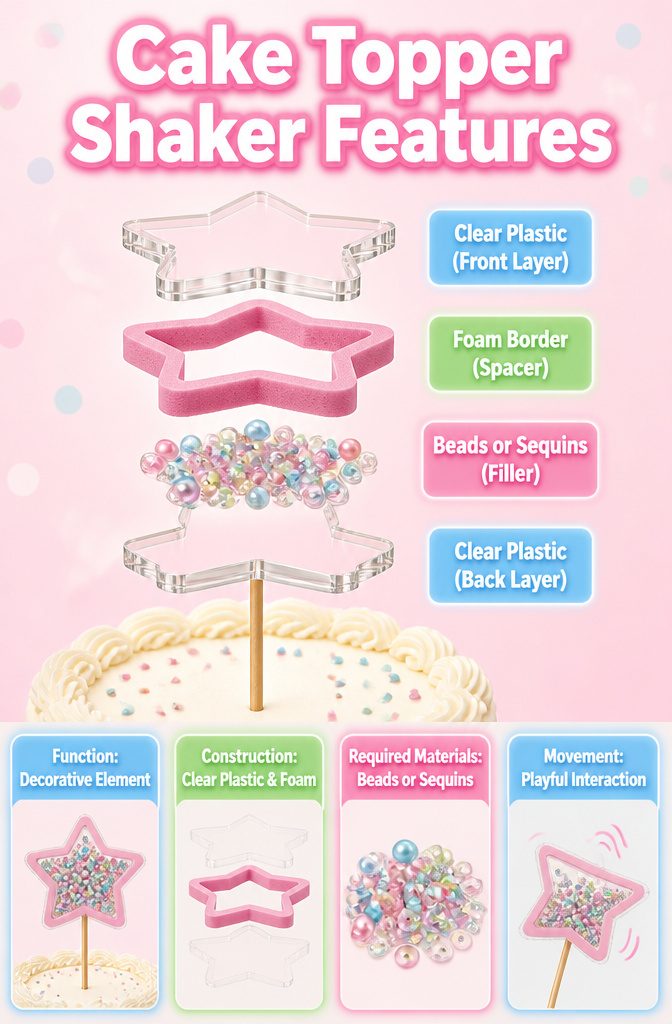
A cake topper shaker is a small, sealed compartment that sits on top of a cake and moves when you tilt it.
The construction is straightforward: two layers of clear plastic with a foam border between them, creating a narrow space you fill with loose material. The foam hides the edge and keeps everything contained.
The layered build is what makes the effect work.
The clear front and back let light through so the filler catches your eye, while the foam spacer sets the depth. Too shallow and the pieces barely shift; too deep and they float instead of tumble.
Most designs land around an eighth of an inch, give or take, which gives beads or sequins enough room to roll without stacking up and sticking.
The shaker gets attached to a stick or skewer that pushes into the cake, so the whole piece stays put while still handling easily.
What sells the project is that movement, the way the contents scatter and settle each time someone walks past or the table gets bumped. It turns a static decoration into something a little playful without needing batteries or noise.
Frequently Asked Questions
How do I make a shaker cake topper?
Build it in three layers: a solid cardstock back, a foam ring that creates the cavity, and a front piece with clear plastic sealed behind a window cutout.
Hot glue sets faster than craft glue and helps keep confetti from escaping at the edges. Once the machine finishes its cuts, assembly moves quickly enough that making a spare is not much extra effort.
What designs can I use for my shaker cake topper?
Mermaid, princess, and dinosaur designs are the three broad looks most makers use, and you can tweak any of them for the birthday kid’s name, age, or color scheme.
A name banner across the top, a number cutout for the age, or a small fondant plaque tucked beside the stick base takes any of the three from party-store generic to made-for-them.
How to make a cake topper easy?
Use free templates for the cutting files so you are not drawing shapes from scratch, and let the Cricut handle the precision work.
This is an afternoon craft, not a weekend build; once the machine finishes its cuts, assembly moves quickly.
What machine makes cake toppers?
A Cricut or similar cutting machine is what most makers use, and it handles all the precision cutting for cardstock, foam, and clear craft plastic.
No specialty store is required, since the machine and its cutting mat are sold at standard craft retailers.
What size cake topper?
Attach the lollipop stick about 1 inch up from the base, which leaves enough stick below the shaker to anchor into the cake without poking through the frosting layer.